
This recipe uses simple ingredients like instant banana pudding mix, an overripe banana, and vanilla wafers to create Banana Pudding Brownies, also known as Banana Pudding Blondies!
It’s a simple dessert that takes little time to prepare, but the end result is a special, nostalgic dessert!

A Southern Classic Bannan Pudding Dessert You Can Hold In Your Hand
Living in the South, I can attest that there is one dessert at almost every potluck, family reunion, or special dinner party: sweet, creamy banana pudding. I wanted to create a handheld version of this classic dessert that was easy to serve without needing a bowl and spoon.
Craving more fruity desserts? Check out Effortless Cherry Dump Cake and Decadent Lemon Jello Poke Cake!

Take a Trip to the Grocery Store
You most likely have all the pantry staples to make this easy dessert, so you only need to grab a few things!

- Banana Extract: I got my banana extract at Walmart, but you can find it in most grocery store baking aisles. Banana Extract infuses a natural, fruity banana flavor into everything from homemade muffins to cakes and cookies.
- Vanilla extract: Brings all the flavors together and creates a layer of warmth.
- Instant Banana Cream Pudding Mix: Using an instant pudding mix adds a creamy banana flavored toppin on your brownies. I used the low-calorie instant pudding mix because I made this for my husband, but regular would be best! (Honestly, he didn’t know it was lower calorie when he had that second brownie.)
- Milk: This is for mixing with the pudding mix to make it nice and thick! Whole milk or 2% will work here.
- Butter: For this recipe, I used salted butter, but feel free to use unsalted butter.
- Sugars: I blend white sugar and light brown sugar to create a chewy texture without being too dense.
- Banana: This recipe calls for one overripe banana, which adds sweetness and moisture to the brownies.
- All-purpose flour: Adds structure to the brownies and provides a tender crumb!
- Baking powder: The leavening agent that helps the brownies to rise.
- Salt: Just a pinch for flavor.
- Vanilla wafer cookies: These give the brownies that classic banana pudding feel and a little crunch.
How To Make Banana Pudding Brownies
This recipe is as easy to make as your favorite brownies! With just a couple of steps, you’ll have a crowd-pleasing dessert in less than an hour.

Mix
- First, you’ll mix the banana pudding mix with milk until it’s thick. Set it aside while you prep the other ingredients.


Combine
- In a large mixing bowl, combine melted butter, brown sugar, granulated sugar, and egg until smooth.


Mash
- Using a masher, mash up the ripe banana until all the big chunks are completely gone. You’ll still have some little chunks, but that’s okay!


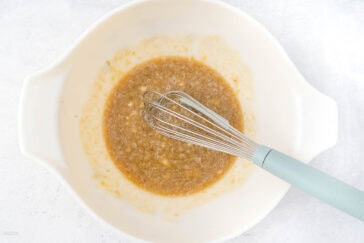
Whisk
- Whisk in the vanilla and banana extracts. Next, add the banana mixture to the wet ingredients and stir to combine.


Whisk
- Whisk all the dry ingredients in a separate bowl.


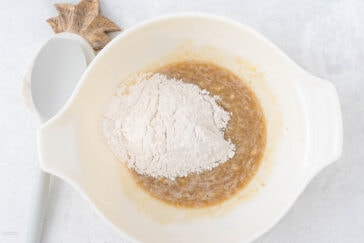
Fold
- Then, fold in flour, baking powder, and salt into the banana mixture. Only fold until all the flour is gone. You don’t want to overmix the batter!


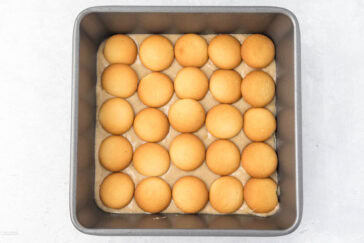
Layer
- Spread half the batter in the baking pan, add an even layer of vanilla wafer cookies, and cover with the rest of the batter.


Next Layer
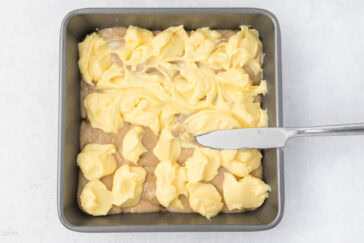
- Pour the other half of the batter over the layer of cookies. Try to spread it out evenly with the back of a spoon or spatula.
- Drop spoonfuls of the banana pudding mixture on top and swirl it in.


Top Layer
- Add another layer of wafers and sprinkle extra wafer crumbs on top!

- Bake for 30-35 minutes or until a toothpick inserted into the center comes out clean.
Gina’s Tips For Recipe Sucess
- Spray your pan with nonstick spray so the brownies don’t stick to the pan.
- Allow the brownies to cool completely. This will keep the layers intact after you slice your brownies.
- Don’t overcook the brownies! If you’re worried about overcooking, set the baking time for 1-2 minutes less and check the brownies. Ovens do vary in how quickly they cook.
- You can mix this recipe by hand or use a hand mixer to speed things up!
- If you’re having a large party and 16 servings isn’t enough, tap the 2x or 3x in the recipe card below, then print the new ingredient amounts.

Variation Ideas
- Want a little crunch? Toss in some walnuts or pecans into the brownie batter!
- Instead of using whole vanilla wafers, you can crush them up and sprinkle them on top!
- I love chocolate-covered bananas, so a few chocolate chips sprinkled into the batter would be yummy.
Do I have to layer the vanilla wafers?
Nope! You can leave out the bottom layer of wafers and just do the top if you like!
Can I use something other than vanilla wafers?
Absolutely! You could use Chessman cookies, shortbread cookies, or any other cookie with a vanilla-ish flavor and a little crunch!
Storing Leftovers
Leftover brownies will remain fresh in an airtight container in the fridge for 3 or 4 days.
I don’t advise freezing them, the banana pudding would probably get watery if frozen then thawed.
✝️ Biblical Reflections Table Talk:
Layered Banana Pudding Brownies are a delightful combination of flavors and textures, each layer adding something special to the dessert. These layers remind us of the depth of God’s love for us. In Ephesians 3:18-19, it says, “May you have the power to understand, as all God’s people should, how wide, how long, how high, and how deep his love is. May you experience the love of Christ, though it is too great to understand fully.” Just as this dessert brings together different flavors into one delicious whole, God’s love encompasses every part of our lives. As you enjoy this treat, reflect on the many layers of blessings God has given you and how you can share His love with others through your hospitality.


Layered Banana Pudding Brownies
Ingredients
- 3.4 ounce instant banana cream pudding mix, box
- 2 cups milk
- 6 tablespoons butter, melted
- 1/2 cup light brown sugar, packed
- 1/4 cup granulated sugar
- 1 large egg
- 1/2 cup banana, overripe, about 1 medium-sized banana
- 1 teaspoon vanilla extract
- 1 teaspoon banana extract
- 1 cup all-purpose flour, leveled
- 1/4 teaspoon baking powder
- 1/2 teaspoon salt
- 3 cups vanilla wafer cookies, plus extra for topping
Instructions
Prep
- Preheat your oven to 350°F (180°C) and spray an 8×8 baking pan with non-stick cooking spray.
Prepare Instant Pudding
- In a bowl, whisk together the instant banana pudding mix and milk until it becomes thick and creamy. Set aside.3.4 ounce instant banana cream pudding mix, 2 cups milk

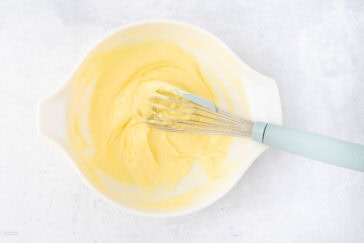
Mix Wet Ingredients
- In a large bowl, whisk together the melted butter, brown sugar, granulated sugar, and egg until smooth.6 tablespoons butter, 1/2 cup light brown sugar, 1/4 cup granulated sugar, 1 large egg
- In a small bowl, mash the overripe banana until smooth using a fork or potato masher. Stir in the vanilla and banana extracts.1/2 cup banana, 1 teaspoon vanilla extract, 1 teaspoon banana extract
- Add the mashed banana mixture to the butter and sugar mixture. Stir until well combined.
Mix Dry Ingredients
- In a separate bowl, whisk together the flour, salt, and baking powder.1 cup all-purpose flour, 1/4 teaspoon baking powder, 1/2 teaspoon salt
Combine Wet and Dry Ingredients
- Gradually fold the flour mixture into the wet ingredients until everything is just combined.
Layer the Batter and Cookies
- Spread half of the banana batter evenly into the prepared baking pan.
- Press vanilla wafer cookies on top of the batter to cover the pan.3 cups vanilla wafer cookies
- Spread the remaining banana batter over the top of the cookies.
- Spoon dollops of the banana pudding over the batter and cookies.
- Use the tip of a knife to swirl the pudding into the batter and around the cookies.
- Add more vanilla wafer cookies on top to cover the pan.
- Sprinkle a few crumbled vanilla wafers on top for added crunch.

Bake
- Bake for 30-35 minutes, or until a toothpick inserted into the center comes out clean.
- Let the brownies cool completely in the pan on a wire rack before cutting into squares.
- Cut into 16 small brownies or 9 larger pieces and enjoy!
can these be frozen?
Roesemary, I think the pudding might get gummy after freezing. If you do freeze them I suggest thawing them in the refrigerator overnight.
When you hit the x2 or x3. It does not change the baking pan size. I can’t imagine putting x2 batter into an 8×8. Would you use two 8×8 or a 9×13?
Great question. You’re right to pause there. When you hit 2x or 3x on the recipe card, it only changes the ingredient amounts. It does not resize the baking pan. That part always needs a human touch.
Here’s the simple rule of thumb for this recipe:
If you double the recipe:
Use two 8×8 pans or one 9×13 pan.
A 9×13 has just a little more volume than two 8×8s, so your brownies will bake slightly thinner but still come out great. Start checking a couple minutes earlier.
If you triple the recipe:
Use one 9×13 plus one 8×8 or three 8×8 pans.
Trying to squeeze a doubled batch into one 8×8 would give you a gooey volcano in the oven, and nobody needs that kind of excitement on a baking day. Do note if you double in an 9×13 you will need to add just a lite more time, maybe 5 minutes or so depending you your oven.