


Canning beef stew meat is an easy way to stock your pantry with shelf-stable tender beef. Using a pressure canner and the simple raw pack method recommended by the National Center for Home Food Preservation, you can turn fresh beef into, tender, ready-to-use meat that holds for a year or more. It only takes two ingredients, beef and salt, and when you open that jar, the beef is juicy, flavorful, and falls right apart.

My love for canning beef goes all the way back to my grandma’s kitchen on the dairy farm where I grew up. Every season when the herd rotated, she’d send a cow to the butcher, and dairy beef, bless its heart, is not known for being tender. So Grandma would can the beef stew meat, and something close to magic would happen inside that pressure canner. What started out tough would come out tender and juicy, ready for soups, stews, and quick weeknight meals all winter long. I loved helping her with that work, and out of that sweet memory, I feel called to share this craft with the next generation.
Excellent canning instructions. I haven’t canned beef in many years so I needed a refresher course. This has everything you need to do it.
— Kevin
Thanks very much.
What You Need for Canning Beef Stew Meat
Here’s a quick overview of the key ingredients for this recipe. For the full list of ingredients and exact measurements, jump to the recipe card.

- Beef: Fresh, chilled, high-quality beef gives you the best results. Sirloin tip roast is my go-to — lean, mild in flavor, and beautifully tender when cubed and pressure canned. Chuck roast brings a little more marbling to keep things moist. A round roast works well too, especially when sliced into chunks.
- Salt: Use canning or pickling salt, not iodized table salt. Iodized salt can cloud your liquid. Salt is technically optional for safety but adds good flavor.
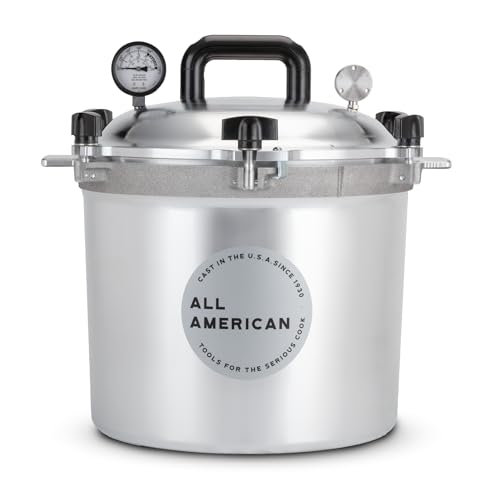
- Equipment: You need a pressure canner in good working order; this is the one non-negotiable for safely canning meat. I have used my All-American 25 Qt Pressure Canner for over 40 years without a single problem. If you are newer to canning, the Presto 23 Qt Pressure Canner is a solid option at a friendlier price. You will also want wide-mouth quart canning jars, new canning seals and rings, a jar lifter, and a canning funnel.
Tip: Many county extension offices will calibrate pressure canner gauges for free or a small fee. If yours has not been checked in a few years, it is worth the trip before your next canning season.

How To Can Beef Stew Meat Step-By-Step
Note: Before you start, be sure to sterilize your jars. Wash jars in hot soapy water and check every one for chips or cracks. Boil them in a large pot for at least 10 minutes or run them through the sanitize cycle on your dishwasher.

- Choose and prep your beef. Start with fresh, chilled beef. Trim off the excess fat, too much fat can affect quality and lead to spoilage. Cut the meat into uniform cubes about 1.5 to 2 inches. Even sizing means even cooking.
- Pack the jars. Set a canning funnel in the jar and fill it with beef cubes. Press the meat down gently with a small rubber spatula. Leave 1 inch of headspace from the rim.
- Add salt. Sprinkle 1 teaspoon of canning salt into each quart jar, or 1/2 teaspoon into each pint jar. Do not add flour, thickeners, or any starch; these interfere with safe heat penetration during canning.

4. Clean the rims and seal the jars. Wipe every jar rim with a clean, damp paper towel; any food on the rim can prevent a good seal. Place a new lid on each jar, center it, and screw the band on finger-tight. Not too tight. Air needs to escape during processing.
Tip: Wide-mouth quart jars can be hard to tighten if you have small hands, as I do. I use a jar ring loosener and tightener tool to get a good finger-tight seal without overdoing it — a small thing that makes canning day a whole lot easier.
Processing Beef In A Pressure Canner
Refer to your pressure canner’s manual for specific instructions on adding water and using the canner.

- Add water: Begin by adding the appropriate amount of water to your pressure cooker based on the manufacturer’s instructions. Typically, you’ll need to add about 2 to 3 inches of water to create steam for the canning process.
- Load the canner and seal the lid: Place the loaded jars in the pressure cooker, following the cooker’s guidelines for spacing and capacity. Place the canner lid on and tightly secure it. Turn the stove burner on medium-high heat.
- Wait for a steady flow of steam: Allow the canner to heat until a steady flow of steam is seen coming out of the vent. The steam indicates that the canner is purging the air and achieving a proper internal temperature.
- Time for steam release: Depending on the size and type of your canner, allow the canner to heat up and produces a steady stream of steam. However, referring to your specific canner’s manual for recommended times is important.
- Add the weight or close the vent: Once the canner has been purged of air and a steady flow of steam is observed for 10 – 15 minutes, you can add the weight or close the vent, depending on the type of pressure canner you’re using. This will allow pressure to build up inside the canner.
- Reach and stabilize at the desired pressure: The canner will take additional time to reach and stabilize at the desired pressure for your recipe. The specific pressure will depend on the altitude and type of canner you have.
- Process for the required time: Once the pressure is reached, start the timer for the required processing time. The processing time and pounds of pressure will depend on your altitude. Processing time will vary depending on the size of your jars. See the chart in the recipe card.
| Dial- Gauge Pressure Canner: Recommended process time for Strips, Cubes, or Chunks of Meat. | ||||||
| Canner Pressure (PSI) at Altitudes of | ||||||
| Style of Pack | Jar Size | Process Time | 0 – 2,000 ft | 2,001 – 4,000 ft | 4,001 – 6,000 ft | 6,001 – 8,000 ft |
| Hot and Raw | Pints | 75 min | 11 lb | 12 lb | 13 lb | 14 lb |
| Quarts | 90 | 11 | 12 | 13 | 14 | |
| Weighted-Guage Pressure Canner: Recommended process time for Strips, Cubes, or Chunks of Meat. | ||||
| Canner Pressure (PSI) at Altitudes of | ||||
| Style of Pack | Jar Size | Process Time | 0 – 1,000 ft | Above 1,000 ft |
| Hot and Raw | Pints | 75 min | 10 lb | 15 lb |
| Quarts | 90 | 10 | 15 | |
Cooling, Testing Seals, and Storage of Canned Beef
- After the processing time is complete, turn off the heat and allow the canner to depressurize naturally. Do not force-cool or remove the lid prematurely.
- Once the canner has depressurized, carefully remove the jars using a jar lifter. Be careful, the contents in the jar will still be boiling. Place the jars upright on a folded in half dish towel on your countertop. *Do not remove the rings.
- Allow the jars to cool undisturbed for 12 to 24 hours.
- Check the seals by pressing down on the center of each lid. A properly sealed jar will not flex or pop. *(See tips below) If a jar hasn’t sealed, refrigerate and consume the contents within a few days.
- Label the sealed jars with the date and store them in a cool, dark place.

My Favorite Slow Cooker Tools
Questions When Canning Beef Stew Meat
What are the best cuts of beef for pressure canning?
You don’t have to hunt for a specific cut to get good results when canning beef. Sirloin tip roast is what I like to use, it’s lean, mild in flavor, and comes out tender when you cut it into cubes before canning. Chuck roast is another one I’ve used with great results. The extra marbling keeps the meat moist after canning, and it is often the easiest to find on sale. Round roast is a leaner option that works well, especially if you slice it into chunks rather than larger pieces. All three give you tender, flavorful canned beef. Use what you can find and what fits your budget.
Can I add liquid when raw packing beef cubes for pressure canning?
Yes, you can add liquid when raw packing beef cubes for pressure canning. Raw packing involves placing raw, uncooked meat directly into the canning jars without pre-cooking. Adding liquid can help enhance the flavor, texture, and overall quality of the canned beef.
Here are a few guidelines for adding liquid when raw packing beef cubes for pressure canning:
- Use a suitable liquid: You can add water, beef broth, or a combination of both as the liquid for raw packing. The liquid helps to provide moisture during the canning process and can contribute to the flavor of the finished product.
- Maintain recommended headspace: Ensure that you leave the recommended amount of headspace (usually 1 inch or as specified in the recipe) between the top of the liquid and the rim of the jar. This headspace allows for expansion during processing and helps to create a proper vacuum seal.
- Avoid overfilling: While it’s important to add enough liquid to cover the beef cubes, avoid overfilling the jars to prevent potential issues with liquid siphoning during processing. Siphoning refers to the loss of liquid from the jars, which can affect the seal and lead to spoilage.
- Follow recipe guidelines: It’s crucial to follow trusted canning recipes or guidelines for the specific type of beef you’re canning. These resources will provide precise instructions on the recommended amount and type of liquid to use, as well as any additional ingredients or seasonings that can be added.
How many pounds of meat can you get in a quart jar when canning meat?
The amount of meat you can fit in a quart jar when canning will vary depending on factors such as the cut of meat, how it is packed, and any additional ingredients or liquid used. As a general guideline, you can typically fit approximately 2 to 2.5 pounds (0.9 to 1.1 kg) of raw, boneless beef cubes or strips in a quart jar when canning.
What is the recommended amount of headspace in canning jars for beef?
The recommended amount of headspace in canning jars for beef in a pressure cooker is typically 1 inch (2.5 cm). Headspace refers to the space between the top of the food (in this case, the beef) and the rim of the jar.
How long does home-canned meat last?
Home-canned foods, including canned pot roast, typically retain optimal flavor for a year or more when stored under proper conditions. The exact shelf life during long-term storage can vary depending on factors such as the food’s acidity, the quality of the canning process, and storage conditions. If canned properly, beef stew meat is shelf-stable for at least a year.
How do I know if my canning jars are sealed properly after pressure canning beef?
After pressure canning beef, checking if the jars have sealed properly is essential for food safety. Wait 12 hours after processing your meat before you check the seals. Here are a few ways to determine if your canning jars are sealed:
- Visual Inspection: After removing the jars from the pressure canner and allowing them to cool, visually inspect the lids. A properly sealed lid will be slightly concave or “dome-shaped” in the center. If the lid is flat or indented, it indicates a good seal. Be sure to remove any screw bands before inspecting.
- Lid Testing: Gently press down on the center of the lid with your finger. A properly sealed lid should not flex or move. If the lid remains firmly in place and doesn’t pop back, it indicates a good seal.
- Listen for the “Ping”: During the cooling process, you may hear a “ping” or popping sound. This sound indicates that the jars have sealed properly. However, it’s important to note that not all properly sealed jars may make this sound, so it should not be relied upon as the sole indicator of a good seal.
- Finger Tightness: Once the jars have cooled completely, remove the screw bands and gently try to lift the jar by holding onto the lid. If the lid holds securely and does not detach from the jar, it indicates a proper seal.
You have a few options if you find jars that did not seal properly. You can refrigerate and consume the contents within a few days, reprocess the jars using appropriate canning procedures, or freeze the contents if suitable for freezing. Always prioritize food safety and consult trusted canning resources or experts for further guidance if you encounter any issues with sealing.
Should I store canned food with the rings on or off for long-term storage?
Once your canned food has been properly sealed and cooled, removing the screw bands or rings is recommended before storing the jars. Here’s why:
- Checking for Seals: Removing the rings allows you to visually inspect the lids and ensure a proper seal has formed. If a jar hasn’t been sealed properly, you can identify it by the lid being loose or popping up. Keeping the rings on may hide this issue and give a false impression of a sealed jar.
- Preventing Rust and Odors: The rings can sometimes trap moisture, which can lead to rusting over time. Additionally, if any food residue remains on the jar or ring, it may cause odors or attract pests. Removing the rings reduces the chances of rust and helps maintain a clean storage environment.
- Easy Cleaning: Without the rings, it’s easier to clean the jars thoroughly before storing or reusing them for future canning projects. Removing the rings allows better access to the jar and lid, ensuring proper hygiene.
However, it’s important to note that the absence of rings does not affect the sealed jars’ integrity or their ability to preserve the food safely. The jars can be stored without the rings as long as the seal is intact. Be careful not to bump the seals when putting them in storage.
Can I use a water bath canner for canning meat?
No, using a water bath canner for canning meat is not safe. To safely can meat, you must use a pressure canner because it can reach and maintain high temperatures above 240°F (116°C). This temperature is necessary to kill bacteria, spores, and other potential pathogens commonly found in low-acid food like meat. Using a water bath canner is not recommended as it cannot reach the required high enough temp to ensure food safety when canning meat.
Favorite Canning Supplies
More Canning Recipes with Meat


Canning Beef Stew Meat
Ingredients
- 15 pounds Sirloin Tip Roast, Options: chuck roast, round roast, brisket, rump roast
- 6 teaspoons salt
Instructions
Prepare Beef For Canning
- Trim off excess fat from raw meat and cut the beef roast into chunks or slices that fit into the jars. Excess fat can lead to spoilage and affect the quality of the canned beef.15 pounds Sirloin Tip Roast
- Cut the beef into uniform-sized cubes, around 1.5 to 2-inch cubes. This ensures even cooking and consistent results.
Packing Canning Jars
- Pack Jars: Place a canning funnel in the jar for easy clean packing of the jars. Fill the jars with beef cubes. Push the meat down gently using a small rubber spatula. However, be sure to leave enough room for expansion during the canning process. When filling the jar with meat, make sure to leave a space of 1-inch headspace from the rim.

- Add Salt: Add 1 teaspoon of salt to quart jars and 1/2 teaspoon to pint jars. You can sprinkle the salt directly onto the beef cubes or add it to the jar before packing the meat. Note* Avoid adding thickeners or flour, as they will interfere with safe canning practice.6 teaspoons salt
- Clean Rims: After filling, remove the funnel and wipe the rim of the jar with a clean damp paper towel. This will remove any food particles and ensure that the lids properly seal.
- Apply lids and bands: Place a new lid on top of each jar, ensuring it is centered. Then, screw on the bands until they are finger-tight. Avoid overtightening, as it can prevent air from escaping during the canning process.

Follow Your Canner's Manufacturing Guidelines For Processing
- Add water: Begin by adding the appropriate amount of water to your pressure cooker based on the manufacturer's instructions. Typically, you'll need to add about 2 to 3 inches of water to create steam for the canning process.
- Load the canner and seal the lid: Place the loaded jars in the pressure cooker, following the cooker's guidelines for spacing and capacity. Place the canner lid on and tightly secure it. Turn the stove burner on medium high heat.
- Wait for a steady flow of steam: Allow the canner to heat until a steady flow of steam is seen coming out of the vent. The steam indicates that the canner is purging the air and achieving a proper internal temperature.
- Time for steam release: Depending on the size and type of your canner, allow the canner to heat up and produces a steady stream of steam. However, referring to your specific canner's manual for recommended times is important.
- Add the weight or close the vent: Once the canner has been purged of air and a steady flow of steam is observed for 10 – 15 minutes, you can add the weight or close the vent, depending on the type of pressure canner you're using. This will allow pressure to build up inside the canner.
- Reach and stabilize at the desired pressure: The canner will take additional time to reach and stabilize at the desired pressure for your recipe. The specific pressure will depend on the altitude and type of canner you have.
- Process for the required time: Once the pressure is reached, start the timer for the required processing time. The processing time and pounds of pressure will depend on your altitude. Processing time will vary depending on the size of your jars. See the chart in the recipe card.
Cooling, Testing Seals, And Storage Of Canned Beef
- After the processing time is complete, turn off the heat and allow the canner to depressurize naturally. Do not force-cool or remove the lid prematurely.
- Once the canner has depressurized, carefully remove the jars using a jar lifter. Be careful, the contents in the jar will still be boiling. Place the jars upright on a folded in half dish towel on your countertop. *Do not remove the rings.
- Allow the jars to cool undisturbed for 12 to 24 hours.
- Check the seals by pressing down on the center of each lid. A properly sealed jar will not flex or pop. *(See tips below) If a jar hasn't sealed, refrigerate and consume the contents within a few days.
- Label the sealed jars with the date and store them in a cool, dark place.
Gina’s Notes and Tips
- Visual Inspection: After removing the jars from the pressure canner and allowing them to cool, visually inspect the lids. A properly sealed lid will be slightly concave or “dome-shaped” in the center. If the lid is flat or indented, it indicates a good seal. Be sure to remove any screw bands before inspecting.
- Lid Testing: Gently press down on the center of the lid with your finger. A properly sealed lid should not flex or move. If the lid remains firmly in place and doesn’t pop back, it indicates a good seal.
- Listen for the “Ping”: During the cooling process, you may hear a “ping” or popping sound. This sound is an indication that the jars have sealed properly. However, it’s important to note that not all properly sealed jars may make this sound, so it should not be relied upon as the sole indicator of a good seal.
- Finger Tightness: Once the jars have cooled completely, remove the screw bands and gently try to lift the jar by holding onto the lid. If the lid holds securely and does not detach from the jar, it indicates a proper seal.
| Dial- Gauge Pressure Canner: Recommended process time for Strips, Cubes, or Chunks of Meat. | ||||||
| Canner Pressure (PSI) at Altitudes of | ||||||
| Style of Pack | Jar Size | Process Time | 0 – 2,000 ft | 2,001 – 4,000 ft | 4,001 – 6,000 ft | 6,001 – 8,000 ft |
| Hot and Raw | Pints | 75 min | 11 lb | 12 lb | 13 lb | 14 lb |
| Quarts | 90 | 11 | 12 | 13 | 14 | |
| Weighted-Guage Pressure Canner: Recommended process time for Strips, Cubes, or Chunks of Meat. | ||||
| Canner Pressure (PSI) at Altitudes of | ||||
| Style of Pack | Jar Size | Process Time | 0 – 1,000 ft | Above 1,000 ft |
| Hot and Raw | Pints | 75 min | 10 lb | 15 lb |
| Quarts | 90 | 10 | 15 | |


Excellent canning instructions. I haven’t canned beef in many years so I needed a refresher course. This has everything you need to do it.
Thanks very much.
Kevin
Thank you Kevin. I really want to do a post on chicken and venison soon. I am going to share your comment in the top of this post so others will be encouraged to can meats.
Love the easy-to-follow instructions for canning beef. Excellent!
Thank you Laurie. I need to do one for canning chicken. We were hit by the Helena storm and have been out of power for 4 days. On day two I pulled all my chicken meat out of the thawing freezer and canned it. Thank goodness for gas cooktops.