Learn the art of water bath canning to safely preserve your favorite jams, jellies, salsa, tomatoes, and pickles with this comprehensive How-To Water Bath Canning For Beginners Guide.
When you learn to can your own food, you can enjoy preserving seasonal foods, ensuring quality ingredients, and saving money. Canning also promotes self-sufficiency and helps to reduce grocery costs by preserving seasonal fruits and vegetables during peak growing seasons.

If you enjoy trying new water bath canning recipes, be sure to check out Cowboy Candy, Canning Salsa Without A Pressure Cooker, Green Salas Recipe, Peach BBQ Sauce, Roasted Red Pepper Spread, and Canning Homemade Mustard.
What Is Water Bath Canning?
Water bath canning is a home food preservation method that involves processing jars of high-acid foods, such as jams, jellies, pickles, and fruits, in a boiling water bath to create a seal, kill bacteria, and extend shelf life without the need for pressure canning equipment. It is a safe and accessible technique for preserving a variety of delicious foods at home.
Why Learn Hot Water Bath Canning
- Stock Your Pantry: Preserving food at home can be a fantastic way to save money, have complete control over what you eat, and experience the pure satisfaction of doing it yourself.
- Safe: Just remember, safety is key. By using the right equipment and following trusted guidelines and recipes, you can confidently create preserved foods that are safe and downright delicious.
- Easiest Method For Canning: Water-bath canning, which is sometimes called boiling water bath canning, is the easiest method to start learning how to home can. The water bath canning process lets you safely store homemade jams, pickles, salsa, and tomato sauce for up to a year.
What foods can I can in a water bath canner?
The boiling water bath method of home canning is recommended for processing high-acid foods. The pH measures how acidic a food is: Foods with a 4.6 pH or less are considered high-acid, and foods with more than a 4.6 pH are considered low-acid. Examples of high-acid foods (pH less than 4.6)
Fruits, Jams, and Soft Spreads
Fruits and spreads are considered high-acid foods. However, figs, rhubarb, and tomatoes require the addition of an acid.
- apples
- apple sauce
- peaches – Peach BBQ Sauce
- pears – Brandy Spiced Pear Compote Recipe
- fruit butter such as apple butter
- grapes
- berries
- tomatoes (require the addition of an acid (require the addition of an acid)
- cherries
- apricots
- figs (require the addition of an acid)
- berries
- plums rhubarb (require the addition of an acid)
- cranberries
Vegetables, Pickles, Chutney, and Relishes
Water bath canning pickled veggies is an excellent option because they’re highly acidic, thanks to the vinegar in the recipes. Here are some foods that you can pickle.
- Cucumbers (for pickles) –Spicy Bread and Butter Pickles
- Carrots (when pickled)
- Green beans (when pickled)
- Beets (when pickled)
- Peppers (e.g., jalapeños, bell peppers) in pickled form
- Radishes (when pickled)
- Corn (in relishes or salsas with added acid)
- Tomatoes (with added acid, such as lemon juice or vinegar, for proper acidity)
- Tomatillos (with added acid for salsa verde)
- Onions (in pickled or relish form)
- Garlic (in pickled form)
- Pickled asparagus
- Pickled Beets
Juices That Can Be Preserved In A Water Bath Canner
Here is a list of fruits that can be used to make fruit juice and can be safely preserved using a water bath canner:
- Apples
- Berries (such as strawberries, raspberries, blackberries, or blueberries)
- Cherries
- Citrus fruits (such as oranges, lemons, limes, or grapefruits)
- Grapes
- Peaches
- Pears
- Plums
- Pineapple
- Cranberries
- tomato juice
Learn Canning Terms

To safely preserve fruits, vegetables, and meats by canning them, it’s important to be familiar with canning related terms. A helpful resource for beginners is a list of Common Canning Terms you can bookmark for future reference. By learning some simple canning terms, you’ll be able to learn how to water bath can confidently.
Water Bath Canning Supplies
To begin water bath canning, you will only need some basic canning equipment.
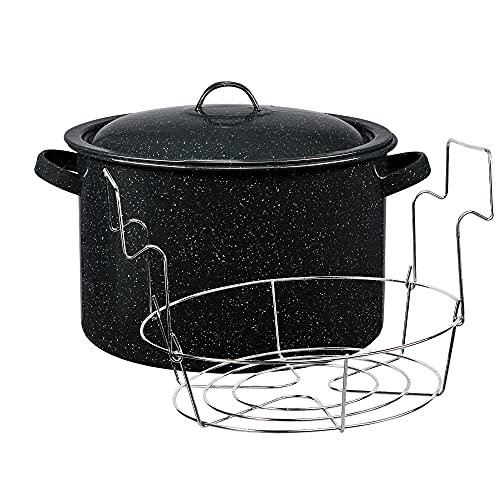
Water Bath Canner
A water bath canner pot is any large metal container with a rack and a tight-fitting lid that can be used as a boiling water bath canner.
The container must be deep enough for 1 to 2 inches of briskly boiling water to cover each jar. The diameter of the container must be no more than 4 inches wider than the diameter of the stove’s burner. For electric ranges, the container must have a flat bottom. Using a rack will prevent jars from touching the bottom of the container and allow boiling water to circulate freely. A pressure canner can be used as a water bath canner if it is deep enough. When using a pressure canner as a water bath canner, the lid should be used but not sealed, and the petcock (safety valve) should be open to allow steam to escape and prevent pressure buildup in the canner.
I have used my Granite Ware water bath canner for 30 years without any issues. However, there are several other good choices of water bath canners.
Granite Ware Covered Preserving Canner with Rack, 12-Quart
McSunley Water Bath Canner with Glass Lid, Induction Capable, 21.5Qt, Stainless Steel
Ball® Jar Collection Elite Stainless-Steel 21-Quart Waterbath Canner with Rack and Glass Lid
Here’s a good tip: If you have a pressure canner that’s deep enough, you can use it as a water bath canner too! Just make sure to use the lid without sealing it, and keep the petcock (that safety valve thingy) open. This allows steam to escape and prevents pressure from building up in the canner.
Jars Best For Canning
Regarding home canning, it is important to use tempered glass jars that can withstand heat and cold. Ball Mason Jars are the most commonly used type of jar, and jars from commercial foods or mayonnaise should be avoided. Jars come in various sizes, but pint and quart sizes are best for most recipes.
How Long Can Canning Jars Be Used?
Jars that are not damaged can be used without any time limit. With proper care, jars can last for years and provide a safe and convenient way to store your favorite foods and other items.
How To Check If Canning Jars Are Safe To Use
It is important to check your jars before every use to avoid breakage while heating and to ensure proper sealing. Simply run your finger gently over the top of the jar to check for any nicks or chips. Inspect the side rims for any chips and hold the jar up to look for hairline cracks. If you notice any of these issues, it is best to discard the jar.
Canning Lids and Rings For Successful Canning
The most common lid type is a two-piece lid with a flat disk and a separate metal screwband. Note: Lids should only be used once, but screw bands can be reused.
Canning Lid Tips
- Lids over five years old, dented, deformed, or previously used to seal a commercial product should not be used.
- Do not buy off-brand inexpensive lids. I have yet to have success with cheap lids. The rubber seal tends to be less quality; therefore, only about 1/2 of the jars appear to seal appropriately.
Optional Utensils For Water Bath Canning
When it comes to home canning, having clean towels, hot pads, and cutting boards are essential. Additionally, several utensils will come in handy, but they are not mandatory.
Jar funnel – To avoid spills and mess, a unique funnel for canning jars is utilized for pouring food items into the jars.
Jar lifter – When jars are hot, a jar lifter snuggly and safely grips hot jars for removal from the canner.
Bubble Freer and Jar Lifter Combo – This plastic spatula or utensil is used to work bubbles out of jars so they are correctly processed.
Pour Spout Spoon – A spoon with a pour spout makes filling jars easier.
Timer –This multi-function digital timer can track up to four separate events, each with its own distinct alarm to aid in identification.
Canning thermometer – You will need a thermometer if your recipe calls for raw pack vs hot pack.
For more information on tools and supplies helpful for canning, visit my Canning Supplies Guide.
Choosing and Making A Canning Reipce
When it comes to water bath canning, it is important to use trusted and safe recipes that have been tested and approved by reliable sources. These recipes are specifically designed to ensure safe preservation by maintaining correct acid levels and processing times. Here are some reliable sources where you can access safe water bath canning recipes.
- National Center for Home Food Preservation (NCHFP): The NCHFP is a reputable resource providing research-based guidelines and recipes for home food preservation. They offer a wide range of tested recipes for canning fruits, vegetables, jams, jellies, pickles, and more. Their website (nchfp.uga.edu) is a valuable reference for safe canning practices.
- Cooperative Extension Service: Your local Cooperative Extension Service is an excellent source of reliable canning information. They often have dedicated home food preservation experts who can provide guidance, classes, and access to tested recipes for your region.
- Ball® Canning: The Ball® brand is well-known for its canning products and resources. They provide tested recipes and canning guides in their canning books and on their website (freshpreserving.com). The Ball® Blue Book Guide to Preserving is a popular resource that contains safe canning recipes.
- USDA Complete Guide to Home Canning: The United States Department of Agriculture (USDA) offers a comprehensive guide to home canning, which includes safe canning recipes. The guide can be found online (nchfp.uga.edu/publications/publications_usda.html) or purchased as a physical book.
Remember, following the instructions and guidelines in these trusted recipes is essential. They will specify the type of produce, the necessary processing time, acidification requirements (if applicable), and other essential details to ensure the safety of your canned goods.
By using qualified, safe recipes from reputable sources, you can
Choosing Fruits and Vegetables For Water Bath Canning
When water bath canning, choosing firm and ripe fruits and vegetables that are not overripe is best. To achieve the best results, keeping the time between harvesting produce and canning as short as possible is recommended.
Cleaning Fruits and Vegetables Canning
- To ensure your safety, begin by washing your hands thoroughly with soap and water.
- Rinse your fruits or vegetables under cool, running water to remove any dirt or debris.
- If you are using firmer produce in your recipe, such as apples or peaches, using a vegetable brush to scrub their surfaces gently is recommended.
- Be sure to dry your produce with a clean kitchen towel or paper towel.
Tip: Use a soap designed for washing fruits and veggies, such as FIT Organic. It’s odorless and USDA-tested for safety.
Canning Liquids for Fruits Fruit
When preserving fruit, many recipes call for water, sugar syrup, or juice.
Juice For Canning
For recipes calling for juice, you can use unsweetened commercial juices like apple, pineapple, or grape as they are or mix them with water. Alternatively, you can extract juice from the fruit by crushing ripe fruit, heating it to a simmer over low heat, and straining it through cheesecloth. The extracted juice can be used as is or diluted with water.
Simple Sugar Syrup
Some recipe call for a simple sugar syrup. Here is a step-by-step guide for making a basic simple syrup when canning.
Ingredients:
- 1 cup of granulated sugar
- 2 cups of water
Instructions:
- In a medium-sized saucepan, combine the granulated sugar and water.
- Place the saucepan over medium heat and stir until the sugar dissolves completely. This process usually takes around 5 minutes.
- Once the sugar has dissolved, increase the heat to high and bring the syrup to a gentle boil.
- Allow the syrup to boil for 1-2 minutes, stirring occasionally to prevent it from sticking to the bottom of the pan.
- After boiling, remove the saucepan from the heat and let the syrup cool for a few minutes.
- Pour the syrup into a heat-resistant container or directly into your canning jars, leaving about a 1/4-inch headspace at the top.
- If you are canning fruits or vegetables that require a hot pack method, pour the hot syrup over the prepared produce while it is still hot.
- If you are using a cold pack method, let the syrup cool completely before pouring it over the prepared produce.
- Seal the jars tightly with lids and process them according to the canning instructions for the specific recipe you’re working with.
Tips For Simple Syrup
- For a lighter syrup, reduce the amount of sugar to 3/4 cup.
- If you prefer a thicker syrup, you can increase the sugar to 1 1/2 cups.
How To Prevent Fruits From Turning Brown When Canning
- If your recipe calls for cutting light-colored fruits like apples, apricots, peaches, and pears, they may darken due to a natural reaction. To prevent this, place the fruit in a holding solution of lemon juice and water until you’re ready to pack it.
- Another option is to add one teaspoon of ascorbic acid (vit. C) to a gallon of water to prevent discoloration.
- You could also use a commercial ascorbic acid solution such as Fruit Fresh. Be sure to follow the manufacturer’s instructions.
Packing Food Into Canning Jars Tips
When preserving produce, you have two options for packing, raw or hot. Follow your recipe to know which option is best.
- Raw packing involves putting the raw fruit directly into a jar and pouring boiling water or syrup on top of the produce. To ensure a tight pack, the fruit is packed tightly, as it will shrink after cooling.
- Hot packing, however, involves cooking the fruit first and then placing it in a jar with the boiling liquid. The fruit is packed loosely, as it will shrink during the cooking process. Hot packing leads to better flavor and color than raw packing.
Water Bath Canning Preparation
Maintain A Clean Workspace When Canning Meats
Clean workspace: Maintaining a clean work area is crucial when pressure canning beef to ensure food safety. Start by thoroughly cleaning and sanitizing your work surface, utensils, and canning equipment before you begin.
Throughout the process, regularly wash your hands with warm, soapy water and keep surfaces clear of any clutter or potential contaminants. Additionally, promptly clean up any spills or messes to prevent cross-contamination. Practicing good hygiene and maintaining a clean work area can minimize the risk of foodborne illnesses and ensure safe canning.
Preparing Jars and Lids
There are a few safety tips that are very important not to skip when preparing your jars and rings for water bath canning.
How To Sterilize Jars
- Discard canning jars with nicks or cracks; damage may prevent an airtight seal from forming.
- Jars that will be filled with food and boiled in hot water for fewer than 10 minutes need to be sterilized. This can be done by boiling them for 10 minutes prior to filling. Each 1,000 feet above sea level will require one additional minute of boiling.
- Keep the jars hot until you use them. This will prevent breakage once jars are filled with hot liquid and placed into the canner.
Lids and Rings
- Only use new canning lids on jars.
- Check all new lids for dents, gaps, or defects in the sealing gasket.
- Previously it was recommended that lids set in hot water for 10 minutes before using. However, Ball recommends the following: “It is no longer necessary to pre-warm lids before use. If you desire, it is still safe to simmer your lids before use, however, you should never boil them.”
Preparing Water Bath Canning Recipes
To ensure safe preservation during water bath canning, it is essential to rely on trusted recipes that have been tested and approved by reliable sources. Such recipes are specially designed to maintain correct acid levels and processing times.
Preheating the Boiling Water Bath
To prepare for canning:
- Start by filling the boiling water bath canner with clean, hot water until it is half full.
- Place the canner over the burner and preheat the water to 140 F if you are raw-packing foods or 180 F if you are hot-packing them.
- If you need more boiling water to cover the jars in the canner, have an extra kettle of water on the stove burner ready to use.
Filling The Jars and Headspace
When filling canning jars, it is best to use a canning funnel to keep drips and spills off the jar rims.
Regardless of the type of packing process called for in a canning recipe, it is important to leave a specific amount of headspace after filling.
Headspace refers to the distance between the jar’s top and the food’s top. Foods that tend to swell during the filling process require more headspace. If too little headspace is left, the food may boil up and out of the jar, which prevents a proper seal.
On the other hand, too much headspace can result in inadequate processing time to drive off the oxygen within the jar, which also prevents a proper seal. To avoid these issues, following the recommended amount of headspace specified in each recipe for each specific product is important.
The recommended amount of headspace in canning jars for beef in a pressure cooker is typically 1 inch (2.5 cm). Headspace refers to the space between the top of the food (in this case, the beef) and the rim of the jar.

Closing the Jars With Lids and Rings
1. When processing a recipe in a water bath canner, air bubbles may form and affect the amount of air space in the jar during processing. To avoid this, use a plastic utensil to remove the bubbles gently (figure 6).
Note* Metal utensils should be avoided to prevent scratches to the glass, which could lead to breakage during processing.
2. After removing the bubbles, wipe the jar’s rim with a clean, damp cloth to remove any debris or liquid (figure 7).
3. Place the metal lid with sealing compound in the center of the jar and screw the metal band lightly in place. Over-screwing can prevent air from escaping, resulting in buckled lids and unsealed cans.
Step-By-Step How To Water Bath Can
Follow these simple processing steps once you have prepared your recipe and placed the rings and seals properly on your jars.
- First, Fill the pot halfway with clean, warm water if you’re using pint jars. For larger or smaller jars, adjust the amount of water accordingly so that it covers the top of the filled jars by 1 to 2 inches.
- To properly prepare your canned foods, place the canner in the center of the burner and heat the water to 140 degrees F. for raw-packed foods or 180 degrees F. for hot-packed foods. While the water heats up, you can start filling your jars with the recipe you chose to make.

- Place prepared jars into the water bath canner.
Method 1: Using a jar lifter, load filled jars fitted with lids and ring bands into the canner one at a time. When moving jars with a jar lifter, ensure the jar lifter is securely positioned below the neck of the jar (below the ring band of the lid). Keep the jar upright at all times. Tilting the jar could cause food to spill into the sealing area of the lid.

Method 2: If you possess a wire rack with handles that are shaped to fit inside your canner and have handles to attach to the sides of the canner, then you can place the jars onto the raised rack and easily lower it into the water using the handles.
- After loading the jars into the water bath canner, add more boiling water, if needed, so the water level is at least one inch above the jar tops. Pour the water around the jars and not directly onto them. For process times over 30 minutes, the water level should be 2 inches above the jars.

- Turn the heat setting to the highest level and cover the canner with the lid. Once the water starts boiling vigorously, set a timer for the total minutes required for processing the food in the recipe.
- During the process, make sure to keep the canner covered. You can lower the heat setting, but ensure that a gentle yet complete boil is maintained throughout the entire process time.
- To ensure that the water level stays above the jar tops, you may need to add additional boiling water during the process. When doing so, pour the water around the jars rather than directly onto them.
- If the water stops boiling at any time during the process, turn the heat on its highest setting, bring the water back to a vigorous boil, and begin the timing of the process over from the beginning (using the total original process time).
- After processing the jars in boiling water for the recommended time, turn off the heat and remove the canner lid. It’s advisable to wait 5 minutes before removing the jars to let the canner contents settle, and the steam dissipate so it’s easier to remove the jar.
- To remove the jars, use a jar lifter and take them out one at a time. Be careful not to tilt them and place them carefully on a towel or a cake cooling rack. Remember to leave at least one inch of space between the jars during cooling and avoid putting them on a cold surface or in a cold draft.
- Allow the jars to cool without disturbing them for 12 to 24 hours. Avoid tightening the ring bands on the lids or pressing down on the center of the flat metal lid until the jar has thoroughly cooled.

- After 12 – 24 hours, remove the rings. Check the seals by pressing down on the center of each lid. A properly sealed jar will not flex or pop. *(See tips below) If a jar has yet to seal, refrigerate and consume the contents within a few days.
- Label the sealed jars with the date and store them in a cool, dark place.
Common Safty Questions About Waterbath Canning
How do I determine the correct processing time for water bath canning?
To determine the correct processing time for water bath canning, refer to reliable canning recipes from trusted sources. These recipes will provide specific instructions on the recommended processing time based on factors such as the type of food being canned, jar size, and altitude.
Following the recommended processing time is essential to ensure proper heat penetration and the destruction of bacteria, enzymes, and other potential contaminants in the food being canned.
For reliable cookbooks on canning, visit Best How-To Home Canning Books For Beginners 2023

Is it OK for jars to touch in a water bath canner?
No, it is not recommended for jars to touch each other during water bath canning. It’s important to leave a small gap or space between the jars to allow for proper heat circulation and to prevent them from clinking or bumping against each other, which can cause breakage or compromise the seal.
What happens if jars pop before the water bath?
If jars pop before the water bath canning process, it means that the jars have not been properly sealed. This can happen when adding hot contents to the jar and securing the lids and rings. The jar still needs to go through the complete water bath canning process.
Can you over process water bath canning?
It is possible to over-process food during water bath canning. Over processing can lead to a loss of quality, texture, and flavor of the preserved food.
Are air bubbles OK when canning?
Air bubbles can sometimes occur during the canning process, and while they are generally harmless, it’s best to minimize them for optimal food preservation. Air bubbles trapped in jars can affect the quality and appearance of the canned product. They can also interfere with proper heat distribution and create pockets where spoilage or bacteria can occur.
To minimize air bubbles, it’s important to properly fill jars, remove air pockets with a utensil like a plastic spatula, and ensure adequate headspace as recommended in canning guidelines. Removing excess air helps create a better seal and maintains the overall quality of the canned food.
How do I know if my canning jars are sealed properly?
After water bath canning checking if the jars have sealed properly is essential for food safety. Wait 12 hours after processing before you check the seals. Here are a few ways to determine if your canning jars are sealed:
- Visual Inspection: After removing the jars from the pressure canner and allowing them to cool, visually inspect the lids. A properly sealed lid will be slightly concave or “dome-shaped” in the center. If the lid is flat or indented, it indicates a good seal. Be sure to remove any screw bands before inspecting.
- Lid Testing: Gently press down on the center of the lid with your finger. A properly sealed lid should not flex or move. If the lid remains firmly in place and doesn’t pop back, it indicates a good seal.
- Listen for the “Ping”: During the cooling process, you may hear a “ping” or popping sound. This sound is an indication that the jars have been sealed properly. However, it’s important to note that not all properly sealed jars may make this sound, so it should not be relied upon as the sole indicator of a good seal.
- Finger Tightness: Once the jars have cooled completely, remove the screw bands and gently try to lift the jar by holding onto the lid. If the lid holds securely and does not detach from the jar, it indicates a proper seal.
You have a few options if you find jars that did not seal properly. You can refrigerate and consume the contents within a few days, reprocess the jars using appropriate canning procedures, or freeze the contents if suitable for freezing. Always prioritize food safety and consult trusted canning resources or experts for further guidance if you encounter any issues with sealing.
Should I Store Canned Food With The Rings On Or Off For Long-Term Storage?
Once your canned food has been properly sealed and cooled, removing the screw bands or rings is recommended before storing the jars. Here’s why:
- Checking Seals: Removing the rings allows you to visually inspect the lids and ensure a proper seal has formed. If a jar hasn’t been sealed properly, you can identify it by the lid being loose or popping up. Keeping the rings on may hide this issue and give a false impression of a sealed jar.
- Preventing Rust and Odors: The rings can sometimes trap moisture, which can lead to rusting over time. Additionally, if any food residue remains on the jar or ring, it may cause odors or attract pests. Removing the rings reduces the chances of rust and helps maintain a clean storage environment.
- Easy Cleaning: Without the rings, it’s easier to clean the jars thoroughly before storing or reusing them for future canning projects. Removing the rings allows better access to the jar and lid, ensuring proper hygiene.
However, it’s important to note that the absence of rings does not affect the sealed jars’ integrity or their ability to preserve food safely. The jars can be stored without the rings as long as the seal is intact. Be careful not to bump the seals when putting them in storage.
What are the signs of spoilage or an improperly sealed jar?
Several signs can indicate spoilage or an improperly sealed jar during water bath canning:
- Unsealed or loose lids: When the canning process is complete, lids should form a concave shape and be firmly sealed to the jar. If a lid is loose, pops up and down when pressed, or can be easily removed, it indicates an improper seal or potential spoilage.
- Leakage or bulging: Check for any signs of leakage around the lid or a bulging lid, as these can indicate microbial growth or gas production inside the jar, which can lead to spoilage.
- Mold or visible signs of growth: If you notice mold, unusual color changes, or visible signs of growth on the food, it is a clear indication of spoilage. Discard the contents of the jar immediately.
- Off-putting odor: If the contents of the jar have an unpleasant or foul odor, it suggests spoilage or the presence of harmful bacteria. Trust your senses and discard the contents if you detect an off-putting smell.
- Unusual texture or appearance: Pay attention to any changes in texture, such as excessive softening or mushiness or any unusual appearance of the food inside the jar. These changes can be signs of spoilage.
If you encounter any of these signs, it’s best to err on caution and dispose of the jar’s contents. Proper sealing and processing are critical for food safety during water bath canning, and any doubts about the seal’s integrity or the food’s condition should be taken seriously and discard the food to avoid the risk of foodborne illness.
Canning With A Pressure Cooker Recipes
When you feel comfortabel with using a water bath canner then you will definalty want to try your hand at pressure canning. The possoiblities are endless for canning quick meals, and long term storage for meats and vegetables.
Visit all the canning recipes to get you inspired. Be sure to visit my recipes for How To Can Vegetable Soup, How To Can Chili, Canning Bone Broth, Tomato Soup with Fresh Tomatoes, Canning Beans, Canning Lima Beans, Canning Chickpeas and Canning Roast Beef.

Water Bath Canning For Beginners Guide
Ingredients
- Water Bath Canner
- Canning Jars
- Rings and New Seals
- Jar Lifter
- Canning Funnel
- Clean Dish Towels or Paper Towels
- Water
- Water Bath Canning Recipe , Prepare you recipe according to safe canning practices. For tips on making and packing your recipe refer to this post.
Instructions
Preparing Jars
- Start by inspecting your canning jars. Look for any cracks or chips, as these can compromise the sealing process. If you find any damaged jars, set them aside for recycling. Once you have your good jars ready, wash them thoroughly with warm soapy water. Rinse them well to remove any soap residue, and place them upside down on a clean dish towel or paper towels to air dry.
Sterilizing The Jars
- Now that your canning jars are clean, it's time to sterilize them. Fill your canner or large pot halfway with water and bring it to a boil. Carefully place the clean jars into the boiling water, ensuring they are fully submerged. Allow them to boil for at least 10 minutes to sterilize. If you live at an elevation higher than 1,000 feet, consult a trusted canning resource for adjusted processing times.
- Using a jar lifter or tongs, carefully remove the sterilized jars from the boiling water, one at a time. Place them on a clean towel, right side up. Be cautious to avoid touching the inside of the jars or the rims, as they need to remain sterile.
Preparing The Lids and Bands
- While your jars are being sterilized, prepare the lids and bands. Place the lids in a small saucepan and cover them with water. Heat the water over low heat, but do not boil. This will soften the rubber seal on the lids, ensuring a proper seal during canning. Keep the lids in hot but not boiling water until you're ready to use them.
Prepare The Canner
- First, Fill the pot halfway with clean, warm water if you’re using pint jars. For larger or smaller jars, adjust the amount of water accordingly so that it covers the top of the filled jars by 1 to 2 inches.
- Place the canner in the center of the burner and heat the water to 140 degrees F. for raw-packed foods or 180 degrees F. for hot-packed foods. While the water heats up, you can start preparing the food for your jars.
- If you need more boiling water to cover the jars in the canner, have an extra kettle of water on the stove burner ready to use.
Filling And Sealing Jars
- Fill Jars: Place a canning funnel on top of the jar to help direct the broth and prevent spills. Slowly pour the hot broth into the jars through the funnel, leaving about 1 inch of headspace at the top of the jar. Avoid overfilling to prevent liquid from interfering with the sealing process.
- Clean Rims: After filling, remove the funnel and wipe the rim of the jar with a clean damp paper towel. This will remove any food particles and ensure that the lids properly seal.
- Apply lids and bands: Place a new lid on top of each jar, ensuring it is centered. Then, screw on the bands until they are finger-tight. Avoid overtightening, as it can prevent air from escaping during the canning process.
Filling Canner and Processing Jars
- Method 1: Using a jar lifter, load filled jars fitted with lids and ring bands into the canner one at a time. When moving jars with a jar lifter, ensure the jar lifter is securely positioned below the neck of the jar (below the ring band of the lid). Keep the jar upright at all times. Tilting the jar could cause food to spill into the sealing area of the lid.
- Method 2: If you possess a wire rack with handles that are shaped to fit inside your canner and have handles to attach to the sides of the canner, then you can place the jars onto the raised rack and easily lower it into the water using the handles.
- After loading the jars into the water bath canner, add more boiling water, if needed, so the water level is at least one inch above the jar tops. Pour the water around the jars and not directly onto them. For process times over 30 minutes, the water level should be 2 inches above the jars.
- Turn the heat setting to the highest level and cover the canner with the lid. Once the water starts boiling vigorously, set a timer for the total minutes required for processing the food in the recipe.
- During the process, make sure to keep the canner covered. You can lower the heat setting, but ensure that a gentle yet complete boil is maintained throughout the entire process time.
- To ensure that the water level stays above the jar tops, you may need to add additional boiling water during the process. When doing so, pour the water around the jars rather than directly onto them.
- If the water stops boiling at any time during the process, turn the heat on its highest setting, bring the water back to a vigorous boil, and begin the timing of the process over from the beginning (using the total original process time).
- After processing the jars in boiling water for the recommended time, turn off the heat and remove the canner lid. It’s advisable to wait 5 minutes before removing the jars to let the canner contents settle, and the steam dissipate so it’s easier to remove the jar.
Cooling Jars and Storage
- To remove the jars, use a jar lifter and take them out one at a time. Be careful not to tilt them and place them carefully on a towel or a cake cooling rack. Remember to leave at least one inch of space between the jars during cooling and avoid putting them on a cold surface or in a cold draft.
- Allow the jars to cool without disturbing them for 12 to 24 hours. Avoid tightening the ring bands on the lids or pressing down on the center of the flat metal lid until the jar has thoroughly cooled.
- After 12 – 24 hours, remove the rings. Check the seals by pressing down on the center of each lid. A properly sealed jar will not flex or pop. *(See tips below) If a jar has yet to seal, refrigerate and consume the contents within a few days.
- Label the sealed jars with the date and store them in a cool, dark place.
Gina’s Notes and Tips
- Visual Inspection: After removing the jars from the pressure canner and allowing them to cool, visually inspect the lids. A properly sealed lid will be slightly concave or “dome-shaped” in the center. If the lid is flat or indented, it indicates a good seal. Be sure to remove any screw bands before inspecting.
- Lid Testing: Gently press down on the center of the lid with your finger. A properly sealed lid should not flex or move. If the lid remains firmly in place and doesn’t pop back, it indicates a good seal.
- Listen for the “Ping”: During the cooling process, you may hear a “ping” or popping sound. This sound is an indication that the jars have been sealed properly. However, it’s important to note that not all properly sealed jars may make this sound, so it should not be relied upon as the sole indicator of a good seal.
- Finger Tightness: Once the jars have cooled completely, remove the screw bands and gently try to lift the jar by holding onto the lid. If the lid holds securely and does not detach from the jar, it indicates a proper seal.