


Apple cider turkey brine is the easiest way I know to guarantee a juicy, tender bird every single Thanksgiving. It’s a simple mix of apple cider, kosher salt, brown sugar, citrus, garlic, and fresh herbs that the turkey soaks in for a day before it ever sees the oven. The salt and sugar work their way into the meat while it sits, so every slice comes out seasoned clear through instead of just on the surface. By the time it roasts, you’ve got a golden, crackly-skinned turkey that’s seasoned all the way to the bone, not just on the surface.

This apple cider turkey brine is the only way I roast a turkey anymore, and it started almost by accident. One year I decided to try brining our turkey and wanted something a little different than a typical brine, more seasonal and festive, so I built it around apple cider and citrus. It turned out so good that it’s been a tradition in our house ever since, the bird goes in the brine the day before, every single year.
This was the best and moist turkey I have ever had. Everybody just kept picking at it. I will recommend this to all my friends they won’t believe it.
—Martha Close

Ingredients Needed for Apple Cider Turkey Brine
Here’s a quick overview of the key ingredients for this recipe. For the full list of ingredients and exact measurements, be sure to check the recipe card at the bottom of this post.
- Apple cider: this is what gives the turkey its subtle sweetness and helps carry all that seasoning into the meat. Grab a fresh-pressed cider from the store if you can, it has more flavor than the shelf-stable jugs. One thing to know before you start: apple cider vinegar is not the same thing and won’t work here, it’s too acidic and will toughen the meat instead of tenderizing it. If you’re out of cider, apple juice makes a fine stand-in.
- Kosher salt: this is the ingredient doing the real work. It breaks down the muscle fibers just enough that the meat can hold onto more moisture, which is the whole reason brining works. Use a coarse kosher salt like Diamond Crystal, it dissolves evenly and won’t oversalt the way fine table salt can.
- Brown sugar: balances out all that salt and adds a little sweetness that seasons the meat from the inside.
- Garlic: I smash the cloves instead of mincing them, just enough to release the flavor without turning the brine cloudy.
- Whole peppercorns: make sure you grab whole, not ground. Ground pepper will cloud up your brine and settle into the meat in a way you don’t want.
- Oranges and lemons: sliced thin so they release their oils into the brine. Give them a good wash first since the peel goes right in.
- Rosemary: fresh sprigs give this that classic Thanksgiving smell the second it starts to simmer. Thyme or sage work well if rosemary isn’t what you have on hand.
- Bay leaves: a small ingredient that adds a lot of depth. Don’t skip it.
- Turkey: For this recipe, you can use a 10- to 20-pound turkey. Be sure it is thoroughly thawed before brining.
- Apples, for roasting: pick a firm baking apple like Honeycrisp or Granny Smith. These go in the cavity while it roasts, not the brine, and they help keep the meat from drying out from the inside.
- Butter: go with unsalted here, the brine has already taken care of the seasoning. This is what gets brushed all over the skin before it goes in the oven.
No, apple cider vinegar is too acidic and will toughen the meat instead of tenderizing it. Stick with sweet apple cider, or apple juice if cider isn’t available.
No, brine should never be reused once it’s been in contact with raw poultry. Discard it completely after each use to keep things food-safe.
How to Make Apple Cider Turkey Brine
Make the Brine
In a large stockpot, combine apple cider, cold water, kosher salt, brown sugar, garlic, peppercorns, orange and lemon slices, rosemary, and bay leaves. Warm over medium heat, stirring until the salt and sugar dissolve.
Turn off the heat and allow the brine to cool fully to room temperature. Never add raw turkey to a warm brine; it must be completely cool to keep your bird safe and juicy.

Soak the Turkey
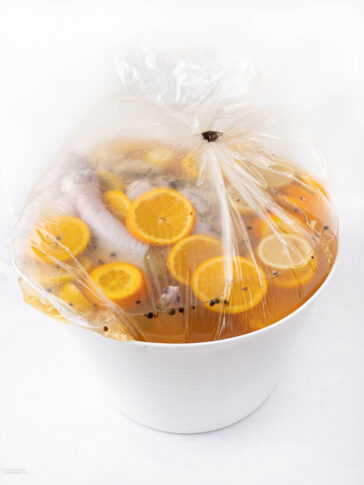
Once your brine has completely cooled, place the turkey in a large Reynolds Kitchens Oven Bag. These sturdy oven bags seal well and fit easily in the refrigerator.
To keep the bag upright and secure, set it inside a plastic storage tub or metal beverage tub before adding the turkey and brine. This setup keeps everything contained and makes cleanup simple.
Pour the cooled apple cider brine over the turkey, making sure it’s fully submerged. Seal the bag tightly and refrigerate for 18–24 hours so the salt and cider can work together to make your turkey tender and juicy all the way through.


Prepare Turkey for Roasting
Remove the turkey from the brine and rinse under cool water to remove any remaining salt and herbs. Pat completely dry with paper towels—this step is key to getting golden, crispy skin.
Tip: don’t rush this step, getting the skin as dry as possible is what actually gives you that golden, crispy finish.
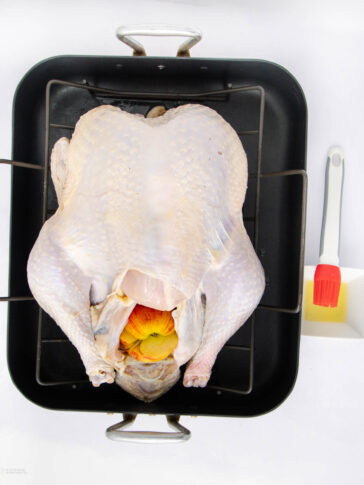
Place the turkey on a sturdy non-stick roasting rack and pan. I love using this dependable pan because it supports the bird securely and catches every drop of drippings for gravy.
Before roasting, fill the cavity of the turkey with fresh apples sliced in half. As the apples roast, their natural juices create gentle steam that keeps the meat moist and adds a subtle sweetness.
Melt a stick of butter, then use a silicone pastry brush to coat the entire turkey, brushing butter under the wings and along the sides. The butter helps the skin brown evenly and keeps the meat tender as it roasts.

Roast the Turkey
Preheat your oven to 425°F. Roast the turkey for 15 minutes to crisp the skin and lock in juices.
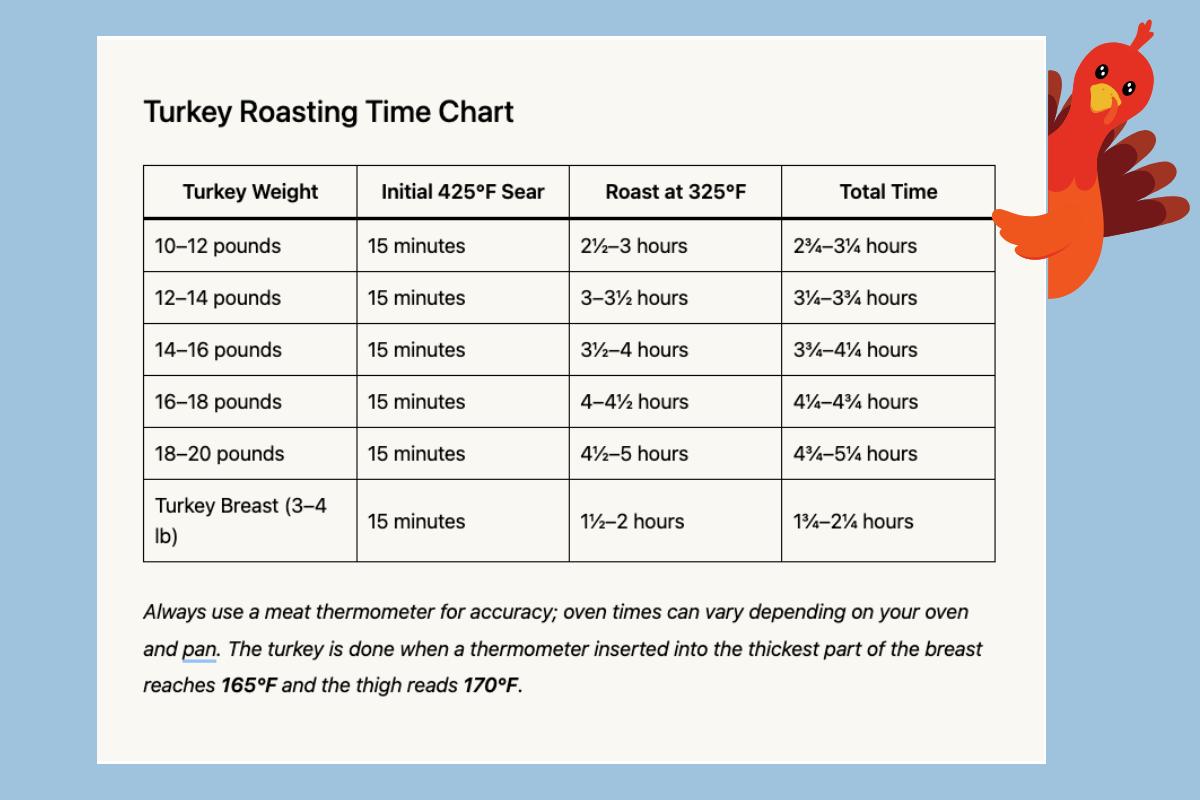
After 15 minutes, reduce the oven temperature to 325°F and continue roasting according to the chart below. The turkey is done when a thermometer inserted into the thickest part of the breast reaches 165°F, and the thigh reads 170°F.
Once finished, let the turkey rest uncovered for 20–30 minutes before carving. Resting allows the juices to settle, giving you perfectly tender slices every time.

If you’re making a smaller holiday meal, check out the Crockpot Turkey Breast Recipe and Stuffing. It’s simple, juicy, and ideal for intimate gatherings.
Turkey Roasting Time Chart
| Turkey Weight | Initial 425°F Sear | Roast at 325°F | Total Time |
|---|---|---|---|
| 10–12 pounds | 15 minutes | 2½–3 hours | 2¾–3¼ hours |
| 12–14 pounds | 15 minutes | 3–3½ hours | 3¼–3¾ hours |
| 14–16 pounds | 15 minutes | 3½–4 hours | 3¾–4¼ hours |
| 16–18 pounds | 15 minutes | 4–4½ hours | 4¼–4¾ hours |
| 18–20 pounds | 15 minutes | 4½–5 hours | 4¾–5¼ hours |
| Turkey Breast (3–4 lb) | 15 minutes | 1½–2 hours | 1¾–2¼ hours |
Always use a meat thermometer for accuracy; oven times can vary depending on your oven and pan. The turkey is done when a thermometer inserted into the thickest part of the breast reaches 165°F and the thigh reads 170°F.
Ways to Change Up This Apple Cider Brined Turkey
- Cooking for a smaller crowd? Use a 3 to 4 pound turkey breast and brine it for 3 to 8 hours instead of the full 18 to 24 hours. You’ll still get all that juicy flavor in much less time.
- Want to skip the oven? My crockpot turkey breast recipe is an easy option for a smaller holiday table.
- Not a fan of rosemary? Swap it for thyme or sage. You’ll still get that classic holiday aroma filling the kitchen, although I always reach for rosemary first because it’s what makes this taste like Thanksgiving to me.
- Want a little more holiday spice? Add a cinnamon stick or a few whole cloves right to the brine for a warmer, lightly spiced flavor.
- Don’t want to brine this year? Try my turkey dry rub instead. It gives you a well seasoned bird without the day ahead soak.
- Is your turkey browning too quickly? Loosely tent it with foil and let it continue roasting until the center is done without burning the skin.
Make This Apple Cider Turkey Brine Ahead for a Calm Thanksgiving
I always make my brine the day before, since it has to cool completely before the turkey ever goes in it anyway. Once it’s mixed, let it chill in a covered pot in the fridge until you’re ready. That’s one less thing standing between you and a relaxed morning. Once the turkey’s in the brine, it’s hands-off for the next 18 to 24 hours, so you can go ahead and get everything else on your list done while it does its work in the fridge, including sides like these make ahead dressing recipes for thanksgiving. This make ahead cranberry sauce is another one you can knock out ahead of time while the turkey does its thing in the fridge.
No, brine should never be reused once it’s been in contact with raw poultry. Discard it completely after each use to keep things food safe.
I don’t recommend freezing this one. Brined turkey holds extra moisture from the brine itself, and that tends to make the texture watery and less appealing once thawed. It’s best enjoyed fresh from the refrigerator instead.


Apple Cider Turkey Brine
Ingredients
- 2 cups apple cider, do not use apple cider vinegar
- 2 gallons cold water
- 1 ½ cups kosher salt
- 1 cup brown sugar
- 5 cloves garlic, smashed
- 2 tablespoons peppercorns, whole
- 2 oranges, thinly sliced
- 2 lemons, thinly sliced
- 5 sprigs rosemary, fresh
- 3 bay leaves
- 1 turkey, 10 to 20 pounds, be very sure it is completetly thawed
For Roasting
- 4 apples
- 3 tablespoons butter
Instructions
Prepare the Brine
- Combine the apple cider, cold water, kosher salt, brown sugar, garlic, peppercorns, orange slices, lemon slices, rosemary, and bay leaves in a large pot. Place the pot over medium heat and bring it to a gentle simmer.2 cups apple cider, 2 gallons cold water, 1 ½ cups kosher salt, 1 cup brown sugar, 5 cloves garlic, 2 tablespoons peppercorns, 2 oranges, 2 lemons, 5 sprigs rosemary, 3 bay leaves


Dissolve the Salt and Sugar
- Cook for about 3 minutes, stirring occasionally, until the salt and sugar have completely dissolved. Turn off the heat and allow the brine to cool completely to room temperature.
Submerge the Turkey
- Place the whole turkey into the cooled brine, ensuring it is fully submerged.
- If your turkey does not fit in the pot, pour the brine into a large brining bag or a clean food-safe cooler and add the turkey.

Refrigerate
- Refrigerate the turkey in the brine for 18 to 24 hours. This time allows the meat to absorb moisture and flavor.
Rinse and Dry
- Remove the turkey from the brine and rinse under cool water to remove any remaining salt and herbs. Pat completely dry with paper towels; this step is key to getting golden, crispy skin.
- Place the turkey on a sturdy non-stick roasting rack and pan.
- Before roasting, fill the cavity of the turkey with fresh apples sliced in half. As the apples roast, their natural juices create gentle steam that keeps the meat moist and adds a subtle sweetness.4 apples
- Melt a stick of butter, then use a silicone pastry brush to coat the entire turkey, brushing butter under the wings and along the sides. The butter helps the skin brown evenly and keeps the meat tender as it roasts.3 tablespoons butter
Roast the Turkey
- Preheat your oven to 425°F. Roast the turkey for 15 minutes to crisp the skin and lock in juices. After 15 minutes, reduce the oven temperature to 325°F and continue roasting according to the chart below. The turkey is done when a thermometer inserted into the thickest part of the breast reaches 165°F and the thigh reads 170°F.
- Once finished, let the turkey rest uncovered for 20–30 minutes before carving. Resting allows the juices to settle, giving you perfectly tender slices every time.
Gina’s Notes and Tips
Tips for Success
Cool completely: Never place raw poultry in warm or hot brine. Always allow the brine to cool fully before adding the turkey.Fresh vs. frozen turkey: If using a frozen turkey, ensure it is completely thawed before brining.
Refrigeration is key: Keep the turkey and brine refrigerated during the entire brining period to prevent bacterial growth.
Storage and Reheating
- Room Temperature: Keep cooked turkey out no longer than 2 hours before refrigerating.
- Refrigerator: Store leftovers in an airtight container up to 3 days, perfect for sandwiches, casseroles, or turkey salad.
- Reheating: Warm turkey slices in a 325°F oven for 10–15 minutes or microwave briefly with a splash of broth. Bake ahead and reheat before guests arrive so you can greet them with a smile instead of an apron full of flour.

Tried this recipe?
Please consider Leaving a Review!Hospitality Challenge
Think of one person nearby who may be far from family and invite them to your Thanksgiving table. Send a clear, simple text with time, address, and a ride offer if needed. Ask about allergies, write their name on a place card, and set a small welcome at their seat with a note that says, “We are thankful you are here.” As the cooked turkey rests, let everyone add one of these beautiful printable Scripture Gratitude Cards to a bowl, then pray together and gently share why you are thankful that Jesus welcomed you first. Remember, “Do not neglect to show hospitality to strangers, for thereby some have entertained angels unawares” (Hebrews 13:2, ESV).

This was the best and moist turkey I have ever had. I’m not a spring chicken anymore so I’ve tried quite a few different ways, but this was so simple and so easy. We only had a handful of leftovers. Everybody just kept picking at it. I will recommend this to all my friends they won’t believe it Turkey seem to be dry anyway unless you do it just right and this is just right.